Networking Client-Server Lab Exercise
(Projects 1-7)
Items Necessary to
Download and Install (if not already on the computer)
Java Developer Kit/Java 2
Platform
Java Plugin for Browser
Java
Files
IPFinder.java
MyLocalIPAddress.java
TCPEchoClient.java
TCPEchoServer.java
UDPEchoClient.java
UDPEchoServer.java
PortScanner.java
GetRemoteTime.java
GetWebPage.java
The purpose of this lab is
to provide you with some insight into how the client-server architecture
actually works. In this lab you will experience a simulated client-server
relationship on your local PC. Later, we will move into creating the same
client-server relationship among multiple computers. Most of this simulation
will take place utilizing java programs that run in the MS-DOS command console.
It will not be necessary to understand or learn Java programming to complete
this exercise. However, you will need to have an understanding of certain DOS
commands and the directory file structures that exist on your computer.
Introduction to Java/DOS/File Directories
The way in which you give
instructions to a computer and receive feedback from the computer is called a
user interface. Java’s user interface may take on many forms. In its simplest
state, the user interface is a command line that displays input and output on a
blank screen, which is called console mode or stand-alone mode. Java
programmers may also view the output of applet programs using a Java tool
called the Applet Viewer. The Applet Viewer, which comes with the JDK and Java
2 Platforms, is like a mini-browser that can display the applet on the desktop.
It loads and executes applets, but does not contain the menus and buttons that
display in a full version of a browser. For all of these projects you will be
utilizing the MS-DOS Prompt window.
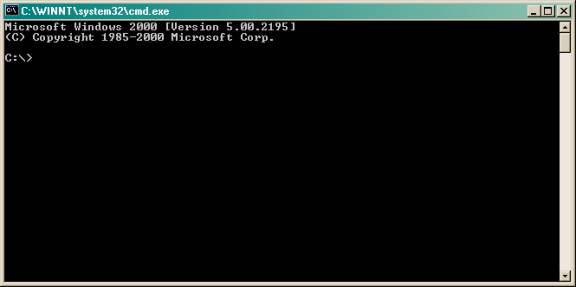
Setting up the Desktop
There are two ways to open
up the MS-DOS prompt window.
First, you can click on the
Start button, Select Programs, Select Accessories, and then Select Command
Prompt.
Or you can click on the
Start button, Select Run, and type in CMD. Either way will produce the
following screen:
Intro to Dos
The following discussion is an abbreviated version from the
author Chuck Scharmann, the full version can be found at http://pages.map.com/~freek/dos.html
.
DOS is an acronym for (D)isk
(O)perating (S)ystem. It is the brains of your computer and very powerful.
Without it your computer wouldn't work. There are several different types and
versions of DOS that basically operate the same way.
The
command syntax is what you type in to make things work. The computer processes
what you type, into special code so that it knows what to do. This code is then
sent to the computers interrupter and then performs the tasks that were
programmed to do.
This
code is unreadable to you, unless you can read hexadecimal. If you view this
program with an editor you'll see nothing but gibberish. This gibberish, when
loaded into a code editor becomes readable to the programmer.
Learning the DOS Syntax
There are two types of DOS
commands. Those that load in when your system boots, and those that are in a
directory called DOS on your hard drive and can be identified with an eight
letter filename and a three letter extension. The commands that automatically
load when your system boots are called internal commands, and those that you
see in the DOS directory called external commands.
Most
of the commands are external, however there are several that must load when the
system boots. The reason is so if your operation system isn't present on the
hard drive you will have some control.
Listed
below are the most common DOS commands
DIR – this command allows you to view the files and
subdirectories in the directory that you specify
CD – this command allows you to change to another
drive or directory
FORMAT – this command creates a new root directory on
your drive or disk. It will also erase all your files as well.
COPY – this command allows you to make copies of your
files or directories
RENAME – this command allows you to change the name or
extension of your files
DEL – this command allows you to delete files
UNDELETE – this command allows you to recover files that were deleted
(NOTE MAY NOT ALWAYS BE ABLE TO RECOVER YOUR FILES)
USING DOS COMMANDS
This can initially appear
tricky as there are in some cases multiple option that you can employ, not to
mention DOS commands in base syntax forms can be very confusing. See Below
COPY [/A|/B] source [/A|/B] [+ source [/A|/B] [+ ...]][destination [/A|/B]] [/V]
/A Indicates an ascii text file.
/B Indicates a binary file.
/V Verifies that new file was written correctly
USED IRL
COPY oldfile.txt newfile.txt
For purposes of this exercise the two main commands you will use will be DIR and CD.
For the CD (change directory command) simply type
CD [drive] [path]
So CD C:\java will make the java folder the current directory (providing it exists)
CD .. (with two periods) will move up one folder from the current directory
DIR [drive:][path][filename] [/P] [/W]
[drive:][path]filename
Specifies the drive, directory and the filename for which you want to see a
listing.
Switches:
/P Displays one screen of
the listing at a time.
/W displays the listing in a wide format.
/A[:] attributes Displays only the names of those directories and files with
the attributes you specify.
H
|
Hidden files |
|
-H |
Files that are not hidden |
|
S |
System Files |
|
-S |
Files other that system files |
|
D |
Directories |
|
-D |
Files only *no Directories* |
|
A |
Files ready for archiving |
|
-A |
Files that have not changed since the last backup |
|
R |
Read only files |
|
-R |
Files that are not read-only |
|
|
|
/O controls the sort order |
|
|
|
N |
Alphabetical order |
|
-N |
Reverse Alphabetical order |
|
E |
Alphabetical order by extension |
|
-E |
Reverse alphabetical order by extension |
|
D |
By date & time, earliest first |
|
-D |
By date & time, latest first |
|
S |
By size, smallest first |
|
-S |
By size, largest first |
|
G |
With directories grouped before files |
|
-G |
With directories grouped after files |
|
C |
By compression ratio, lowest first |
|
-C |
By compression ratio, highest first |
/S Lists every occurrence in
the specified directory and all sub directories of the specified filename
/B Lists each directory name or filename one per line
/L Displays unsorted directory names and filenames in lowercase
Examples:
DIR /a Lists all files on
drive A
DIR /s/w/o/p alphabetizes with wide format and pauses after each screen.
DIR /s/w/o/p/a:-d Same as above but omits the directory names
DIR > list.dir Sends the directory to a file name called list.dir
For more details on options,
syntax, or how a command works in DOS you can always type in the word HELP
followed by the DOS command.
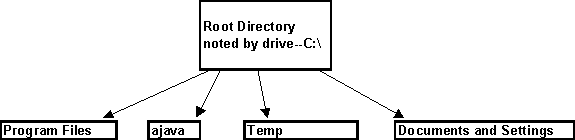
File Directories
DOS and UNIX both utilize a
tree structure for directories. At the top of the tree is your root directory
followed by subdirectories or folders. It is very important that you attempt to
create some sort of logical ordering sequence for your files and folders as it
will ease the locating process in the future. Listed below is an example of a
directory structure on your local computer.
Setting up the Java
Development Kit (JDK) in MS-DOS
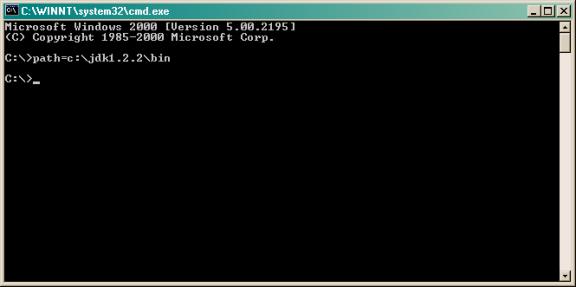
In order to begin to execute
Java Programs in MS-DOS it is important to set the path to where the Java
Complier resides. The compiler is a programming language that translates source
code that is closer to English, to executable code that is closer to machine
language. The files with the .java extension are all source code for running
networking programs. The Java compiler that you downloaded actually turns the
source code into bytecode that is denoted by .class. Bytecode is the code that
can be interpreted on any machine. The name of the interpreter is called the
Java Virtual Machine (JVM). To set the path of the java compiler you can type
in the following command (if you downloaded it off the website or you are in
the lab)
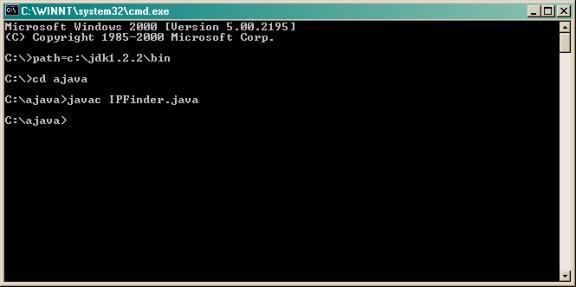
Path=c:\jdk1.2.2\bin
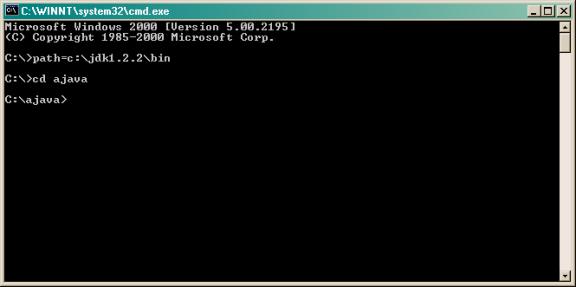
The next step is to change
into the directory that you downloaded all of your .java source code files. If
you have not already done so, you should create a folder called ajava in the C
directory. Typing cd ajava will change your current directory to where your
java programs are, if you do not change your directory the compiler won’t know
where or how to find your files.
Once this step is completed
you are all set to start compiling your programs and creating your client and
server relationships. Now, you might be wondering how you compile your
programs? Good question—this is easily done by knowing and remembering the
command javac. The exact syntax is javac FILENAME.java. If everything is
executed correctly you will see a return to a blank C:\ prompt. If there is an
error in the code you will see an error message. See below:
Now we’re ready for some
networking!
Utilizing Some Java Networking Programs
Prior to this lab exercise
we have discussed fundamental network protocols and techniques. This lab will
illustrate how these protocols and techniques can be used and implemented.
There are many useful classes written in the JDK that will allow us to
communicate with other servers on the internet, or internally on your own
server. Again, you will not need to have programming knowledge to write or
debug java networking programs save for the previous items covered.
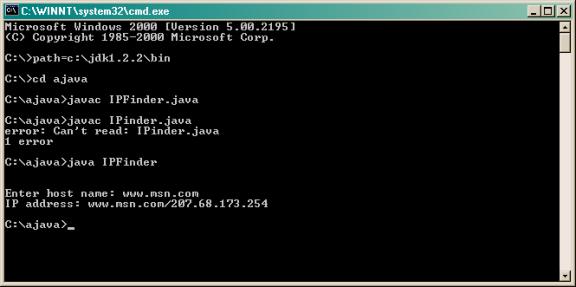
Project One – IP FINDER
Download IPFinder.java
This simple program is a
tool that can be used to find the IP address of a particular host. The ‘guts’
of this program utilize the DNS server to make a match of URL name to its
listed IP address. To run this program, you must first compile the program by
typing javac IPFinder.java. Then to actually execute the program type java
IPFinder. You will then be prompted to enter in a host name, enter in
www.msn.com. Your end result should look like the screen below:
Rerun the program to find
the IP addresses for the following hosts:
- www.cnn.com
- www.espn.com
- www.sandiego.edu
Make a screen shot of your
results (hint hold down ALT & PRINT SCREEN) and paste the picture
(CONTROL+V) into a Word Document under the heading Project One Results.
Project Two MY LOCAL IPADDRESS
Download and use MyLocalIPAddress.java
Sometimes we would like to
retrieve our local IP address. This program will do this for us. Repeat the
same steps as in project one to compile and execute the program. Upon
completion, take a screen shot and paste into the same word document—except
this time placing the picture under Project Two Results.
Project Three- Client/Server relationships
in TCP/IP
For this project you will
need to download the following:
TCPEchoClient.java
TCPEchoServer.java
These programs should help
reinforce not only the client-server relationship, but the concepts of ports
and sockets. Remember that a port is a logical connection to a computer (not
physical) and is identified by a number in the range 1 to 65,535. These numbers
have no correspondence with the number of physical connections to the computer,
of which there may only be one. Ports are implemented upon all computers
attached to a network, but we are only concerned with port numbers that refer
to server programming running on them. For example port numbers 1 to 1023 are
normally set aside for “well-known” services, like port 80 which is typically
used by a web server. For each port supplying a service there is a server
program waiting for any requests. These programs run in parallel on the host
machine (server). Then a client attempts to make a connection with a particular
server program, it supplies the port number of the associated server. The host machine will examine the port
number and pass the client’s transmission to the appropriate server program
waiting for processing.
However, in most
applications there are likely to be multiple clients wanting the same service
at the same time. A common example of this requirement is that of multiple
browsers (potentially 1,000’s) wanting web pages from the same server. The
server needs some way of distinguishing between clients and keeping their
dialogues separate from each other, hence this is what sockets do. Now keep in
mind that a socket is an abstract concept and NOT an element of computer
hardware. Basically a socket refers to the two ends of a communication point
between client and server.
Here is a little bit more on
how it works, when a client wishes to make a connection to a server it creates
a socket on its end and basically asks the server to do the same. The server
then will create a new socket on its end that will be dedicated to
communication with that client on the specific port number. This process can be
repeated many times over, so that port 80 could have 1,000’s of sockets
associated with it.
Lets see how this concepts
works in our networks. This example will utilize a TCP socket, which is a
connection-oriented link. This means that the connection between server and
client remains open until it is formally broken by one of the two parties. To
run this example you will need to open two MS-DOS command prompt windows. In
the first window compile the TCPEchoServer.java program. In the second window
you will need to compile the TCPEchoClient.java program. Once both programs
have been compiled you will be ready to execute the programs. To execute the
connection, first run the server java program (NOTE THAT IF YOU DO NOT RUN THE
SERVER PROGRAM FIRST IT WILL CRASH), followed by switching to the second window
and running the client program. In this example the server will accept a single
line text message from the client and reply with an echo. This dialogue will
continue until the client sends the ***CLOSE*** message to the server, to which
the server will reply with a confirmation message.
Once both programs are
running, type three messages in the client window—with the third one being
***CLOSE***. Then rerun the client program and type two more messages with the
second message being ***CLOSE***. Upon completion make a screen shot of both
server and client windows and paste in your word document under Project Three
Results.
Project Four – Client/Server Relationships
in UDP
For this project you will
need to download the following:
UDPEchoClient.java
UDPEchoServer.java
We have discussed in class
how TCP/IP sends multiple packets and actually makes a connection, whereas UDP
(datagram) sends a packet(s) but it does so in an isolated transmission. As
such UDP is a connectionless link. As noted in class UDP can provide a faster means
of transmitting data, but they can be unreliable. This example will provide you
with a more visual representation of the differences between TCPIP and UDP.
Repeat the same steps as you did in Project Three, but this time using the two
different UDP java programs. Create screen shots of the two windows and paste
under the heading Project Four Results. Also under your screen shots provide a
brief discussion of the differences between your results in Project Four versus
Project Three.
Project Five Moving towards GUI’s and
obtaining remote information
For this project you will need to download
the following
GetRemoteTime.java
This project seeks to show
how the java network programs can be transported in to more graphical user
interfaces. It also illustrates how programs can be created to obtain
information from other hosts. This program uses the Daytime protocol to obtain
the date and time from port 13 of a user-specified host. However, you should
note that it may be difficult to actually obtain this information as many hosts
have firewalls that prevent this information. Compile and run this program.
Test the following URL’s isec.sandiego.edu, www.sandiego.edu, and
192.195.154.13 (or 192.168.10.4 if in the lab). Create a screen shot of your
results and paste them into your word document under Project Five Results.
Project Six Checking for Open Ports
For this project you will
need to download the following
PortScanner.java
This is an example of a
program that checks a range of ports on a specified host and reports those
ports that are providing a service. Compile and execute the program. Make a
screen shot and paste your results in your word document under Project Six
Results.
Project Seven Viewing a Simple Browser
For this project you will
need to download the following
GetWebPage.java
This program displays the
contents of a file at a user-specified URL and actually displays the results
similar to a web browser. The only difference is the applet viewer does not
contain any of the buttons as in other types of browsers. Also the size of the
browser is pre-set so some pages may have both vertical and horizontal scroll
bars. Compile and run the program. Type in the URL http://www.sandiego.edu .
Create a screen shot and paste your results in your word document under Project
Seven Results. Save your word doc as YOUR_LAST_NAME_CS_LAB1_7. Print out and
email to Carl.